As teachers, we know that we are ALWAYS assessing, and then of course using that information to guide our instruction. With the help of technology, that task has never been easier.

Below are four tools that can help you assess daily understanding of material and information in your classroom.
Kahoot
The great thing about Kahoot is that students can have ANY device in their hands for this service. iPads, PCs, Macs, cell phones all work for Kahoot!
- First, you can create online quizzes at www.getkahoot.com. You have two options here: making your own quizzes and activities OR selecting from thousands of already made Kahoots from other teachers/users. One warning here…ANYONE can go on and make a Kahoot, including students and those in other professions, so definitely make sure that you check it over before using this with students.

- Once you’re ready, you can pull up your quiz on a projector or display in your room.
- Students will then be given a Game Pin that they will enter on kahoot.it. Yes, the students’ Web site is different than the teachers’ site. Students enter their game pin, their nickname, and they are ready to go.
- Your questions will now be displayed as you click through them on your teacher account. This site is not meant to test students or actually take a grade; it’s to review and to get some quick feedback. I assure you that you will have just as much fun as you kids will.
Nearpod
Nearpod is an app, which in my opinion works best on the Apple Platform, but it can be used on any platform including PC, iPads, Macs, or Android devices.
With Nearpod, you can create lessons which include slides, graphics, videos, or content from the web. You control the material with the teacher version of the app or web site. Just showing the information definitely isn’t the best part of Nearpod, but instead the ways in which students respond and stay engaged takes the prize.
When creating the lesson, you can add in various activities to check for student understanding.
*Polls
*Asking an open-ended question.
*Making a quiz
*Drawing a picture
*Fill in the blanks
The great part is that you can then throw all students answers or overall averages of the questions asked to students back to the student devices. This is all controlled by the teacher on his/her device.
Another option that you have within Nearpod is to purchase pre-made lesson from the Nearpod store. Some of these are professionally created, while some are created by teachers, which are most likely better than the professional lessons. 🙂
Plickers
One of the most frequently asked questions that I hear is,
“What tech can I use when my school has so little?”
I can 100% relate to this question, as my district is in the same spot. Teachers want to use tech to help their students succeed,  there is just a serious lack of hardware and software to support learning in this capacity. With that being said, we are always looking for ways to integrate new forms of technology in our, generally, technology-less classrooms, and there are so many companies out there catering to this type of school and classroom. They seem to have read our minds about wanting technology that we could use without our districts approval and lack of funding. These are the companies that are helping our under-funded schools get the help we truly need.
One of these software developers is called ‘Plickers.’ A friend told me about this software a few weeks ago, and after using this with my kids for the last couple of weeks, this is hands-down one of the best FREE apps/Web sites I have used in a very long time.
Plickers markets itself as, “…a powerfully simple tool that lets teachers collect real-time formative assessment data without the need for student devices.”
Formative assessment has never been easier in my classroom than it is with this app.
Here is a step-by-step list of how I implemented Plickers in my classroom:
1. Register for FREE at www.plickers.com.
2. Create a class within Plickers, by simply placing each of your kids’ first and last names.
3. Now go into the library tab on the Web site and create questions. The two options are either multiple choice or true/false. After creating your questions, you are going to assign this to a specific class. There is a little ‘+’ where you can assign this to one or more classes that you have created.
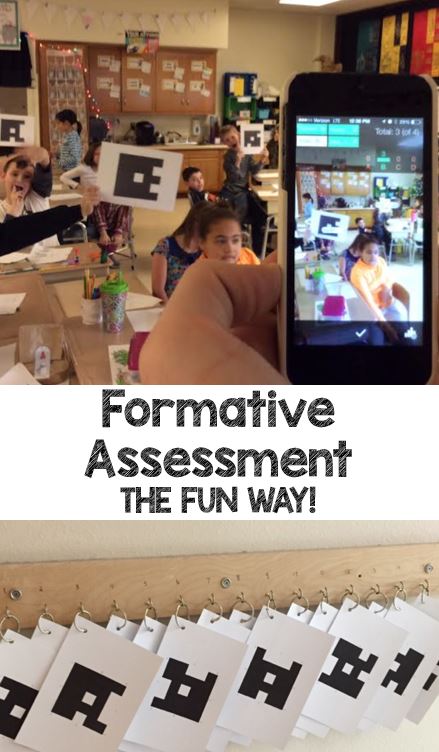
4. On the top left side of the web site, there is a button where you actually need to print your plicker cards. These will be assigned to your students. I would suggest printing these either on card stock or heavier paper, and then laminating for extended use. I was worried that my fourth graders would have a difficult time understanding how to use the cards, but they understood this much more quickly than I did.
6. Now, you’re set. Once you give your kids a little background on how things work, click on live view on your projected computer screen. I’m not going to lie, this may be hard if you don’t have a TV or projector in your room to duplicate your computer display. If you do, awesome! Click on “Live View” on your computer. Whichever question you have pulled up on your phone will show up on your computer.5. Download the Plicker app on either an Android device or on a Apple device and sign in using the registration you created earlier. You will see the class that you created within the app.
7. Students now figure out the answer to your question, and hold up their cards. You need to click on the image of the camera, which will pull up another screen that looks like your camera, but instead of taking a picture, it will scan the room for Plicker cards. Students’ answers will be taken and immediately assessed on your phone screen, giving you very quick, reliable, and easy data.
I stand by my thought that this is probably one of the best new, free apps out there…groundbreaking, even! With that said, there are currently new developments being made to Plickers. One of the major downfalls is that you can’t look at a set of questions and see a student’s overall grade. It’s not really meant to have this functionality, but it still would be nice to see an overall grade based on an entire question set. You can see a data analysis per question, which is very helpful, don’t get me wrong. I would like Plickers to just take that extra step.
It would also be nice to see way to organize and group questions that you create a bit more effectively. You create the questions and they go into a big pool of questions, which can be saved for later. At this point, though, there is no way to group questions into let’s say, “4.NBT.1 Question Set.” Developers are surely working on improving and getting feedback and will make these adjustments in the near future, we hope.
Plickers is one of those apps/sites that anyone can use, with whatever technology you have in your classroom and school. It’s not one of those fancy apps that has little impact, simply providing glitz and glamour, it’s a beefy app with a ton of potential to truly transform your data collection and formative assessment.
Happy Teaching!
-Dan Mault
